

DIY Montessori Materials for Fine Motor Skills
Table of Contents
- Why DIY Montessori Materials for Fine Motor Skills Work
- DIY Montessori Activities for Toddlers: Pouring, Scooping, and Transferring
- Threading, Lacing, and Beading Projects You Can Make Tonight
- Cutting, Tweezing, and Pincer Grasp Practice With Everyday Items
- Fine Motor Skills Development Milestones: What to Expect and When
- Montessori Toys for 1 Year Olds: When to Buy vs. Make
- Safety, Supervision, and Storage for DIY Materials
- Frequently Asked Questions
Last Updated: September 27, 2026
Why DIY Montessori Materials for Fine Motor Skills Work
DIY Montessori materials for fine motor skills work because they isolate one movement at a time, use real objects, and let the child repeat until their hands figure it out. A homemade pouring tray costs almost nothing and teaches the same grasp, aim, and control a store-bought set does. Parents tell us they built a first transferring activity from a muffin tin and dried beans, then watched their toddler focus for twenty minutes.
What Makes a Material Montessori-Aligned
A material is Montessori-aligned when it teaches one skill, fits the child's hands, and lets the child see their own mistake without an adult pointing it out. Self-correction matters more than price.
Check any activity against these four points:
- Single skill focus: A pouring jug teaches pouring. It does not also flash lights or play music.
- Child-sized tools: Small pitchers, short tongs, and blunt-tip scissors sized for toddler hands.
- Natural materials: Wood, ceramic, metal, and cotton give real weight and texture. Plastic feels like nothing.
- Self-correcting design: A bean that misses the bowl lands on the tray, and the child sees it.
DIY Montessori Activities for Toddlers: Pouring, Scooping, and Transferring
Pouring, scooping, and transferring are entry-level practical life skills that build wrist rotation, hand strength, and hand-eye coordination at once. Start with dry materials before liquid, and expect spills for two weeks.
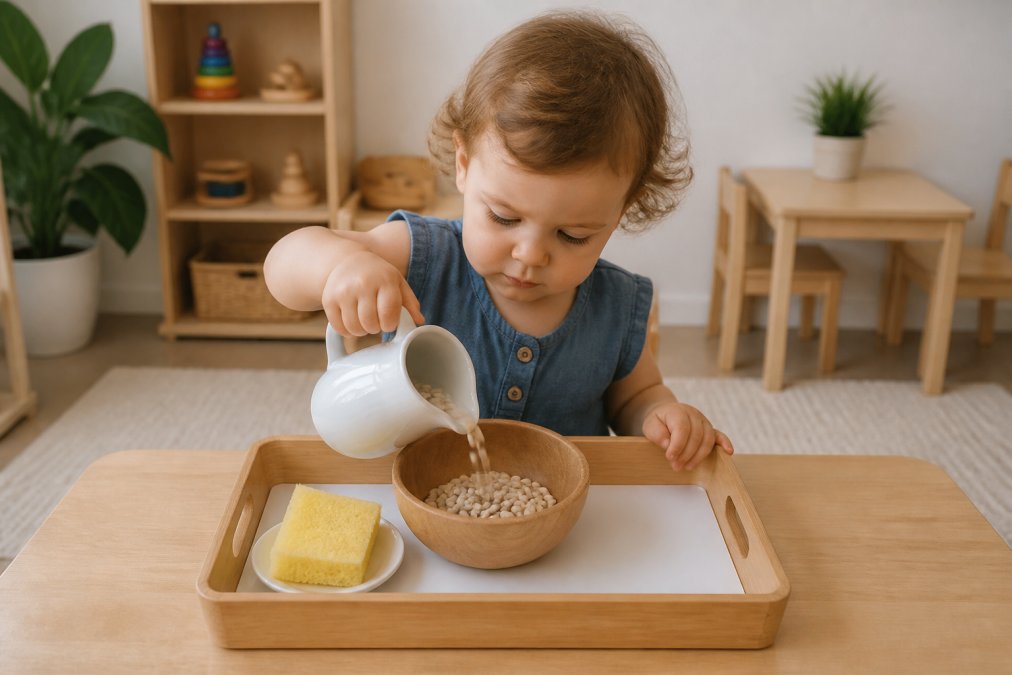
Setting Up a Transferring Station
Set up a transferring station on a low shelf at your child's height. Everything sits on one tray, so they can carry it, work, and put it back without help, that independence is the lesson.
- Choose a tray with a lip. A rimmed baking sheet or wooden tray catches spills and defines the workspace.
- Add two containers. A small pitcher and a bowl work well. Keep the opening wide at first.
- Fill with dry material. Dried beans, rice, or large pasta. Skip anything small enough to swallow.
- Include a sponge or cloth. Your child wipes up their own spill. Do not rush in to help.
- Rotate the material weekly. Swap beans for rice, then water, once pouring stays dry.
Threading, Lacing, and Beading Projects You Can Make Tonight
Threading and lacing build the pincer grasp and bilateral coordination, using both hands on different jobs at once. A lacing card takes five minutes to make from a cereal box and a shoelace, and most other materials are already in your kitchen or recycling bin.
Build the Progression, Not Just the Activity
Threading is a ladder, not one skill. A child handed beads before they can hold a lace steady will get frustrated and quit. Work it in order:
- Drop and post (12-18 months): Push large pom-poms or wooden balls through a hole in an oatmeal container lid. No string involved. This teaches the hand-to-target motion.
- Chunky threading (18-24 months): Thread large wooden beads, cut-up pool noodles, or rigatoni onto a stiff pipe cleaner. It holds its shape, so beads stay put and your child gets a finished result.
- Lace and pull (2-3 years): Move to a shoelace or yarn stiffened with tape. Start with a lacing card, where the hole is fixed and the card does not move.
- Free beading (3-4 years): String beads onto yarn or a thin cord with no card to anchor it. Bilateral coordination shows up here: one hand holds the cord while the other places the bead.
- Pattern and sequence (4-5 years): Thread by color or size pattern. This adds a cognitive layer on top of the motor skill.
Materials That Actually Work
- Rigatoni and penne: Cheap, large, and easy to grip. Dye with food coloring and vinegar, then dry on a paper towel.
- Cut-up straws: A straw cut into two-inch sections makes a lightweight bead that is easy for small hands to hold.
- Large wooden beads: Look for beads at least one inch across. Craft and thrift stores often sell bags for a few dollars.
- Curtain rings: Already threaded, they make a good first lacing material because the hole is wide.
- Cereal-box lacing cards: Cut a rectangle, punch holes around the edge, and reinforce them with tape so they do not tear.
- Pool noodles: Slice into one-inch coins for a soft, oversized bead that is nearly impossible to choke on.
Why This Activity Matters
Threading teaches precision and concentration in a way few activities do. A child threading beads is quiet, focused, and working through a problem with their hands, the state Montessori called normalization. Repetition is the point, so let your child thread and unthread the same five beads for twenty minutes.
Cutting, Tweezing, and Pincer Grasp Practice With Everyday Items
Cutting and tweezing target the pincer grasp, the thumb-and-index grip that later holds a pencil. Both use tools you already own and need supervision until your child handles them safely.
- Stage one: Snip the air, then snip fringe on a strip of paper. No line to follow.
- Stage two: Cut across a wide strip in one snip.
- Stage three: Cut along a thick straight line.
- Stage four: Cut simple curves and shapes.
Fine Motor Skills Development Milestones: What to Expect and When
Fine motor skills development milestones give you a rough map, not a deadline. Children vary widely, and a toddler late on one skill is often early on another. Use these ranges to decide what to offer next, not as a scorecard.
Tender Tots Wooden Tool Disassembly →
| Age | Typical fine motor milestone | Activity to offer |
|---|---|---|
| 12-18 months | Grasps small objects with whole hand, bangs two objects together | Scooping with a large spoon, posting pom-poms |
| 18-24 months | Stacks 2-3 blocks, turns pages, scribbles with a crayon | Stacking, board books, chunky threading |
| 2-3 years | Uses pincer grasp, strings large beads, snips with scissors | Threading, tweezing, free snipping |
| 3-4 years | Cuts along a line, draws circles, copies a cross | Cutting strips, drawing, beading |
| 4-5 years | Draws shapes, buttons clothing, uses a fork | Beading patterns, practical life tasks |
Readiness Cues: When to Introduce the Next Tool
The table shows what is typical; readiness cues show what your child is ready for now. Watch for these before moving up a level:
- Before scissors: Your child can hold a crayon with a tripod grip, tear paper into strips on purpose, and follow a simple "open and shut" hand motion. If they are still mouthing paper, wait.
- Before tweezers or tongs: Your child can pick up a single pom-pom with thumb and index finger and drop it into a bowl without crushing it.
- Before small beads: Your child has stopped putting non-food items in their mouth consistently, and can hold a lace steady with one hand while the other hand works.
- Before liquid pouring: Your child can pour dry material without spilling most of it, and can wipe up a spill without being asked.
When to Check In With a Professional
The CDC developmental milestones checklist lists these skills by age and is worth keeping on your fridge. Most children hit these skills within a wide window, and a single missed milestone is rarely a concern.
Talk to your pediatrician if you notice:
- Your child is not using a pincer grasp by 18 months.
- Your child consistently uses only one hand before age three, or favors one hand so strongly that the other stays fisted.
- Your child's hand trembles or tires quickly during fine motor tasks.
- Your child is behind across several milestones at once, not just one.
Track Progress Without an App
Tracking progress needs no app or wall chart. A monthly note on your phone listing what your child can now do tells you more than any milestone poster. Write one specific thing: "threaded five beads on a pipe cleaner without help," not "doing better with beads."
Montessori Toys for 1 Year Olds: When to Buy vs. Make
Montessori toys for 1 year olds are worth buying when the material needs precision you cannot make at home, and worth making when the skill is simple and the material cheap. Most of a one-year-old's shelf should be the second kind.
Safety, Supervision, and Storage for DIY Materials
- Choking size: Use a choke tube tester or the cardboard-tube rule. Anything that fits inside a toilet paper roll is too small for under-threes.
- Non-toxic finishes: Seal unfinished wood with food-safe oil or child-safe paint. Avoid chipped paint and loose hardware.
- Sharp edges: Sand rough wood, tape cut cardboard edges, and inspect scissors and tongs for burrs.
- Supervision: Stay in the room for anything involving scissors, small parts, or water. For dry transferring with large materials, nearby is enough.
Budget-friendly sourcing is easier than it sounds. Cereal boxes, egg cartons, jar lids, curtain rings, and fabric scraps cover most of what you need. Thrift stores and buy-nothing groups fill in the rest. You do not need a matching wooden set to teach a toddler to pour.
Frequently Asked Questions
How do I make Montessori materials at home without spending much?
Start with what you already own: dried beans, rice, measuring cups, muffin tins, shoelaces, and child-safe scissors. A pouring station needs only two small pitchers and a tray. Threading can use pasta and yarn. The key is presenting one activity at a time on a tray, not buying specialty supplies. Budget-friendly sourcing means checking dollar stores, thrift shops, and your own kitchen before ordering anything new.
What are good Montessori toys for building fine motor skills?
Look for materials that isolate one skill: transferring, threading, tweezing, or scissoring. A wooden tool disassembly playset, for example, builds hand strength and hand-eye coordination through twisting and turning. For younger toddlers, simple posting boxes and stacking rings work well. The best toy is one your child can use independently and repeat without frustration, with a clear beginning and end to the activity.
At what age should I start Montessori fine motor activities?
Most children show readiness between 12 and 18 months, when they begin grasping small objects with a pincer grasp. Start with large, easy transfers like moving pom-poms between two bowls. By age 2, many toddlers can pour dry ingredients and thread large beads. By age 3, cutting with safety scissors and tweezing become realistic. Follow your child's interest and dexterity rather than a strict timeline.
What household items are safe for Montessori fine motor play?
Safe options include dried pasta, large beads, pom-poms, wooden clothespins, measuring spoons, and child-safe tweezers. Avoid anything small enough to fit through a toilet paper tube if your child still mouths objects, and skip sharp tools. Always supervise. Check that items are non-toxic, have no loose paint, and are large enough to prevent choking. Rotate materials weekly to keep the shelf interesting and safe.
How do I know if my child is meeting fine motor milestones?
Typical milestones include grasping small objects by 12 months, stacking two blocks by 15 months, scribbling by 18 months, and turning book pages by age 2. By age 3, many children can draw a circle and use scissors. These are ranges, not deadlines. If your child consistently avoids grasping or shows hand weakness, talk to your pediatrician. Tracking progress through observation, not testing, fits the Montessori approach.